Tuesday, 26 April 2011

Angel Food Cake

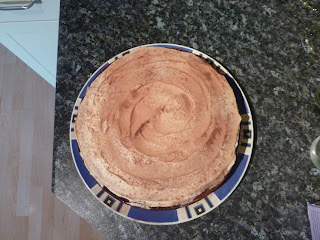
It has been a trying weekend, even with the bank holiday break to look forward to. Unfortunately I got struck down by a nasty and rapidly developing cold which then, inevitably, got passed onto my 7 month old baby girl. Had a birthday cake finish baking and decorating, the party for said cake to attend and a BBQ to host over the bank holiday, as well as fighting off the cold myself and helping the bubba through hers. With all this going on the baking and blog suffered, but I managed to redeem myself and make one yesterday, the Angel Food cake.

This is a recipe I have wanted to do for a while but was waiting to find a ring tin. I finally got one but then went away to see my family and left it at home so knew I would be making it sooner rather than later. It was a short recipe and so was also perfect to ease me into the blog and baking again after being under the weather and meant I could bake it once the little one had gone down for the night too.

This recipe differs from a usual sponge, in that there is not butter or milk as ingredients but plenty, in fact 10, egg whites instead. Had to whip those into a frenzy until the formed soft peaks, which took a good 10 minutes and resulted in an aching arm again. Then I switched from my beloved electric handheld whisk and used a good old wooden spoon to fold in the dry ingredients. Used my fail safe technique yet again and greased the ring tin with butter then dusted with flour and poured the mixture in and into the oven it went. 

Again this recipe differs from the usual ones in the time it took to cook. This cake took 50 minutes, which is the longest one I have baked so far. Guess this is down to the difference of ingredients. Once it was cooked and cooled I dusted it with icing sugar as suggested although this did absorb into the sponge so would couldn't actually see that I had attempted to decorate it.

Since I baked it in the evening, by the time it had cooked and cooled it was late and so we didn't get to taste this one until today. I waited for Hubby to come home and we tried it together after dinner. The sponge was very springy, even when cutting it and wasn't crumbly like a normal sponge. The texture in the mouth was unusual, you could taste the lemon and almond in the sponge and it left a nice after taste too. Even so I have to admit that this wasn't one of my favourites. It was down the to texture of the sponge, wondering if the egg whites were whipped enough (any advice would be great) or if it is just how the cake is meant to be. Hubby liked it but 
agreed the texture was unusual too.


Sunday, 17 April 2011

Blood Orange Cheesecake

After having no luck in the supermarekts for the Blood Oranges I was worried that I wound have to change the recipe to the Strawberry and Cream cheesecake and wait until next week when the oranges might have made it to season. My mother asvised there was a local green grocers down the road and so it would do no harm to have a quick check in there too. As it turns out, they had plenty in stock, it does pay to support your local community.

Started this recipe around midday so the cheesecake was as fresh as possible and so it had enough time to chill in the fridge before it was required as our Sunday Roast dessert.

It was as I was blitzing the biscuits that I realised we were lacking in the eggs needed for the cheesecake filling. Made up the base with the butter and biscuits and squished it into the tin and into the fridge to set..then realised I hadn't added the grated orange zest into it. Decided to just grate it onto the top rather than disturb the nicely compacted base. Can't seem to get through a recipes without some sort of hitch, guess it makes for interesting reading though.

Once that was back in the fridge I nipped down the road again for eggs and a few other bits needed for the family dinner. Eggs sorted I got to work on the cheesecake filling. Have not used Ricotta cheese in baking or generally eaten it and was surprised by the texture of it, a lot lighter than the philedelphia also used in the recipe. Added the zest and then juiced the oranges for the juice needed in the gelatine topping. Into the oven that went and this time I did not submerge it in the water bath but on the shelf above it.

Once cooked it came out perfectly, only had one small crack in the top of the cheesecake byt the side, not as big as the previous cheesecake that was submerged in the bath, and this crack would be covered by the gelatine later on. Left it to cool slightly on the side before popping into the fridge.

Just before the main meal I made the jelly up and  covered the top of the cheesecake with it before it went back in to chill for the final hour. I then settled down to a lovely sunday roast with the family whilst the fridge did the rest of the hard work.

The tasting came along with the Chocolate Chunk Pecan Pie and the family. The gelatine on top had not set evenly as the cake must have been slopping slightly on the fridge shelf but still looked okay. This was my first choice as dessert and it was zingy, lighter and the base was much more solid than the previous cheesecake that suffered the water flood from being submerged. The other family members that tasted it also agreed it was lovely and light, the ricotta cancels out some of the strong philedelphia taste and lets the orange come through. Prefer this cheesecake over the Summer Fruits one, much more my tastes.


Chocolate Chunk Pecan Pie

This Saturday was the turn of the Chocolate Chunk Pecan Pie, on behalf of my Mother, as pecans are her favourite and ever since I arrived she has been begging me to make something with them. Since this is also my last weekend here I obliged.

Made the dough for the base of the pie, it took me a few attempts to get it rolled and into the pie dish as every time I lifted it up over the rolling pin it fell apart. I decided to put it back into the fridge for a little longer to try and cool it a little more even though it was in there for 30 minutes before rolling for first time, as stated. This was the first time I have made pastry dough from scratch, I have to admit that before I usually cheated and bought the ready to roll dough or a pre-made sweet pastry cases. Once I managed, after several attempts, to get the dough rolled and into the pie dish it went into the fridge to chill again for 30 minutes. It then needed to be cooked with a baking sheet and baking beans for 10 minutes and then again without for another 10 minutes. I still haven't invested in any baking beans yet, which I will rectify as soon as possible, so instead I used uncooked rice (2 of the boil in the bag kind).

Whilst I waited for this, I set about making the filling, so heating the sugar, syrup and butter together until they formed some sort of treacle like mixture. The pecans took me a long time to chop, even roughly, as they kept pinging around under the knife. Then added the chocolate along with them into the now partly cooked pie base. The treacle like mixture was then poured over the top of everything and the pie was back in the oven on one temperature before reducing slightly for the remainder.

It smelt wonderful when it came out of the oven and was cooling on the side. I wanted to cut into it right then and there and have a taste, but alas had to wait until Sunday after another Family Roast. I am not usually one who favours nuts but this looked delicious and I have to say, exactly like the picture in the cook book.

So after waiting a whole day to taste it, the time had finally come. All of the family had a piece of the pie and everyone agree it was brilliant. I myself had a small slice and have to admit, even though nuts are not my favourite, it was lovely. The chocolate chunks added the little something extra amongst the nuts and I was very pleased with how the pastry base turned out too. Would recommend this recipe for nut and chocolate lovers alike.


Monday, 11 April 2011

Carrot Cake Whoopie Pies

After the first attempt at the whoopie pies with oversized Chocolate ones I decided to use a bun tray to try and get all the pies equal in size. Also replaced the faulty scales so away we go...

As I was getting all the ingredients out I realised I didn't pick up any more icing sugar when shopping the other day and it was now 3.55pm so with only 5 minutes until the shops close! Cue a walk down the road to the local convience store, praying they have some in stock..it must have been my lucky day and two boxes came home with me.

Started making the recipe, all going well and my kind mother even peeled and grated the one carrot needed. All went smoothly until I was measuring out the butter and then again realised I haven't now got enough butter to make the icing. Another trip down the road beckoned but that could wait til the batter was made and in the oven. I was a little worried the grated carrot wasn't as fine as needed and would stand out too much once the pies had cooked.

I used my now fail safe technique of greasing the pans with butter and then dusting with flour. Ever since I used it for the Lemon and Thyme loaf it has become one of my favourite tips. Then measured about one tablespoon of batter into each bun hole in the tin and it made 20 perfectly, which will make 10 pies in total. Into the oven they went and this time the needed no more than the 13 minutes given.

Once they were out and cooling I could see an evident problem..they had domed on the top which wasn't an issue but I know it happened as they had to go up rather than out like on a baking tray. They had domed on the bottom as well which meant that it was going to be an issue to try and sandwiche them together. My solution was to trim a little of the bottom off. This worked in getting them all paired up and together but meant they had to lie on their sides as the dome on the top stopped them sitting normally.

With 7 people in the house to taste test them it meant my creations didn't last long after all those hours of baking. The grated carrot mixed in fine and it worked well with the spices in the mixture. Everyone agreed they were delicious. Some said the icing was a little sweet but I don't think it was as bad as the icing in the chocolate whoppie pies. This is because I halved the quantity so there wasn't any left over or as much in each whoopie pie and the cinnamon also took some of the edge off the marshmallow fluff. I think a little more carrot could have been needed as couldn't taste it that much, not like in a normal carrot cake.

Overall another success although I think I will be going back to using a baking tray covered in greaseproof paper. Will stick to the one tablespoon per pie measurement as that worked out perfectly in getting the amount stated in the right size but need the baking tray to get them flatter. All trail and error though, whats a good blog without some mistakes eh.


Saturday, 9 April 2011

Chocolate Guinness Cake

Second weekend away from home in Sunny Cornwall and the 3rd cake to be made here, this time the Chocolate Guinness Cake. It is to be eaten/tasted tonight as dessert for a 'Come dine with me' style meal my parents are hosting, so not just family tasting my creation this weekend.

Still getting used to the kitchen and equipment here, it is putting me out of my baking flow not knowing where everything is automatically and the space is smaller than my kitchen at home so takes some pre-planning to work out where going to measure and mix everything first. Made sure I had all the ingredients ready a few days in advance to try and stop last minute rushing around but obviously that never goes to plan.

The recipe for the cake started off in melting down some of the ingredients over the hob, including the Guinness, and adding them to the few dry ingredients there were to make the batter mixture. It started off well until the scales started playing up and kept zero-ing themselves or turning off. Luckily I had made sure I knew the weight of the bowl In was using so could work from that but it frustrated me so ended up having to go and purchase a new battery. This unfortunately didn't do the trick and so we have come to the conclusion that the scale are actually knackered. Going to try and replace them tomorrow (even though they are my Mother's) as I cannot bake the whoopie pies tomorrow with faulty ones.

Even with the dodgy scales, I think, I managed to measure everything out correctly and the ingredients and mixture came together well so seems like we avoided what could have been a massive disaster. The cake went into the oven at the temp given but it took in total about 1 hour 5 minutes to bake completely. Again I am putting this down to the difference in oven and also the fact the mark to show where the dial is set to has worn off and so it is a little bit of guess work in where it is set correctly. Even so the baking time didn't make a difference, the cake turned out wonderfully and smelt lovely as it was cooling.

I left it to cool for an hour or two before making the icing. It was only after I started to measure that I realised I didn't actually have enough icing sugar for the recipe. Stupidly forgot to pick up another packet when shopping yesterday and so had to half the recipe and just frost the top of the cake. This said it did make it look slightly more like a pint of Guinness though, so I suppose it was fitting! Finished it off with a dusting of cocoa, although it didn't quite turn out to be a light dusting after a slip of the hand so there I was,cake held over the sink, blowing a bit of the excess off! It made it look much better though and even with the lack of icing and the heavy handed 'dusting' I was pleased with the finish.

Now to sit back and wait for the dinner party to get around to tasting. Everyone there had a slice, including myself and it made 12 large slices ( i was not in charge of cake cutting) and it was gorgeous. It is a slightly dense cake than most in the cook book, due to the Guinness and the buttermilk but it was wonderfully chocolatey and had a tint of something else that wasn't the strong Guinness taste I was expecting. Was so moist anf the cream cheese frosting pairs perfectly with the cake, a definite for cake lovers, one of the guests even had seconds! The portions were large though and I couldn't finish mine even though I tried very hard but everyone agreed it was a wonderful. A slice remains to be tasted by my sister tomorrow when she returns, providing someone doesn't pinch it for themselves latter..I am making NO promises.


Monday, 4 April 2011

Lemon and Thyme Loaf

This loaf was made first thing in the morning on Sunday. Didn't have the energy or time to make it the night before and it needed it done early so could also be taken over to the Family Roast that afternoon. This was another first for me,as  in making a loaf.

I haven't been able to find a loaf tin to the exact size needed in the cook book. The one I have is just slightly bigger length and width wise and slightly shallower but not by much. The basic loaf ingredients are as you would expect and this time I had no trouble in measuring everything correctly, even without my glasses. Did start to chop the lemon thyme up with the stalks but they didn't seem to chop well so instead I decided to pick out the longer ones and strip the remaining stalks of their leaves. Grated the lemons for their zest which was arm tiring once again and I was also then left with the conundrum as to what to do with the lemons themselves as needed the zest of three but the juice of just one for the mixture. I just squeezed the remaining two and stored the lemon juice in the fridge for use later one in the week, either in baking or cooking.

The loaf took a little longer than 50 minutes to cook, it was in there for a total of 65 minutes. This I think is down to it being a different oven to the one at home and also the loaf tin being slightly bigger than needed, of course this would affect the cooking time. The loaf also rose quite a bit over the top of the tin, it didn't over spill but the top was more domed when compared to picture in the cook book. Still looked nice though, it didn't spoil the asethetics.

Whilst that was cooking for the last few minutes I made up the syrup and started to boil that. Whilst boiling I kept stirring to make sure nothing burnt on the bottom and was thinking that it still looked rather watery. It reduced by half and as soon as the loaf was baked it was poured over the top and then left to soak and cool. When I came down to check on it some half an hour later it looked much more like a syrup, it was sticky and thick as I hoped, I guess it just needed to cool a little. I used a palette knife to loosen the loaf around the edge of the tin as was worried how it would come out even though it was greased with butter and dusted with flour prior to use. I am always worried how well the cakes and things will come out of the tins as I never seem to be able to get them out level, some of it always gets stuck and left behind. I tipped the tin slightly with my hand on the top of the loaf and it slide out perfectly. Will use the butter and flour technic on all my cakes from now in.

It cooled on the side then went back into the tin for transportation along with the Grasshopper Pie to the family roast. This loaf went down the best out of the two deserts. Everyone had a slice and agree it was very light and moist with a wonderful lemon smell and the thymecomplimented the lemon well to create a subtle flavour. The syrup on top added a nice tangy kick that wasnt overpowering. It also tasted nice topped with my Grandmother's strawberry trifle! This loaf didn't return home with us but instead was kept by my Grandparents for seconds and thirds.


The Grasshopper Pie

After a long drive from Surrey to Cornwall, I didn't have much energy to cook up a wonder in the kitchen. Picked The Grasshopper Pie as its a fridge set recipe and will be a quick after the days journey.

A Simple recipe to make, I  had a helper in my 13 year old brother on this one. He melted down the ingredients whilst I measure and sifted. Nothing too tricky but I was a little dubious about whipping the double cream up. Never whipped my own cream and just didn't see how it would work or how long it would take. Once started it was actually simple, as you would probably expect, it just gave me arm ache from holding that electric whisk up for 5 minutes each time.

Not sure what happened with the biscuit base either, I'm sure I measured the butter and cookies out correctly but instead of them being coated and able to squeeze together, the mixture was very runny and sloppy. It worked okay once in the dish and set in the fridge but was more sticky and hard than crumbly. Only thing I can put this down to is the butter being too melted. I will have to see how any future biscuit bases made this way will fair. It still set fine, was just a little difficult to serve once the pie was completed.

The base and then filling were completed that night and left to chill in the fridge. It was being taken to a family meal on Sunday afternoon so didn't want to whip the double cream for the topping until the last mintue as was again unsure how it would hold up overnight and on the way there. Didn't have any chocolate shavings to decorate so instead used lightly sprinkled cocoa powder. The finished product looked lovely, very tempting.

The tasting came from the whole family after our Sunday Roast. Everyone agreed it was a lovely desert, light and creamy but some did suggest it needed a little more peppermint than stated as with the cream as the filling and then the topping made it a little overwhelming. The amount of flavouring added was what the recipe stated but after reflection I think I agree, it needed a little more of a kick to combat some of the creaminess. Overall a nice desert that is a little different from the usual sweet pies and is a nice recipe to make if you haven't got much time. If anyone else has made this recipe, let me know if you incurred any of my problems or conclusions too.
Even so we took the remaining pie home last night and it might just be calling me now for elevenes heehee!